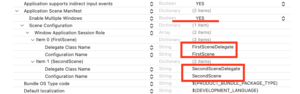
在Info.plist中配置多窗口支持
- Enable Multiple Windows 置为 YES
- 新建一个Scene配置(如果只有一个窗口,则不需要此操作)
判断当前环境是否支持多窗口
iOS13及以上支持多窗口;iPad设备和Vision设备支持,但iPhone不支持。
 if (@available(iOS 13.0, *))
{
    if (UIApplication.sharedApplication.supportsMultipleScenes)
    {// Info.plist也配置了多窗口开关

        if  (UIDevice.currentDevice.userInterfaceIdiom == UIUserInterfaceIdiomPad
            || UIDevice.currentDevice.userInterfaceIdiom == UIUserInterfaceIdiomVision)
        {
            //支持多窗口
        }
    }
}
使用API创建新窗口
创建新的SceneDelegate
当App启用Scene后,需要使用Scene管理Window。为了管理新窗口,我们新建一个SceneDelegate
@interface SecondSceneDelegate : UIResponder < UIWindowSceneDelegate ,NSUserActivityDelegate>

@property (nonatomic,strong) UIWindow * window;

@end

@implementation SecondSceneDelegate
// 将要连接到某个场景(Window需要依附在具体场景)
- (void)scene:(UIScene *)scene willConnectToSession:(UISceneSession *)session options:(UISceneConnectionOptions *)connectionOptions
{
    if (self.window == nil)
    {
        SecondSceneViewController *vc = [[SecondSceneViewController alloc] init]; // 自己定义的页面
        UINavigationController *naviVc = [[UINavigationController alloc] initWithRootViewController:vc];//页面导航
        self.window = [[UIWindow alloc] initWithFrame:[UIScreen mainScreen].bounds];
        self.window.windowScene = (UIWindowScene *)scene;
        self.window.rootViewController = naviVc;
        [self.window makeKeyAndVisible];
    }
}
@end
创建新窗口
使用requestSceneSessionActivation
NSUserActivity * activity = [[NSUserActivity alloc] initWithActivityType:@"open_by_first"];
[UIApplication.sharedApplication requestSceneSessionActivation:nil  //此参数为nil时,表示要求系统创建一个SceneSession
                                                  userActivity:activity
                                                       options:optios
                                                  errorHandler:^(NSError * _Nonnull error) {
    NSLog(@"%@",error);
}];
同时兼容iOS13及以上和iOS12及以下
请先去除工程中的StoryBoard的相关配置(否则,以下代码可能不会完全生效)。
在Info.plist中配置多窗口支持(参考上文)
略
修改AppDelegate
@interface AppDelegate : UIResponder <UIApplicationDelegate>

@property (nullable, nonatomic, strong) UIWindow *window; // 添加属性,注意这是UIApplicationDelegate的协议实现

@end

@implementation AppDelegate

- (BOOL)application:(UIApplication *)application didFinishLaunchingWithOptions:(NSDictionary *)launchOptions
{
    if (@available(iOS 13.0, *))
    { //iOS 13,启用Scene后,窗口在Scene的实现里创建
        return YES;
    }
    else
    {
        FirstSceneViewController *vc = [[FirstSceneViewController alloc] init]; // 自己定义的页面
        UINavigationController *naviVc = [[UINavigationController alloc] initWithRootViewController:vc];//页面导航
        self.window = [[UIWindow alloc] initWithFrame:[UIScreen mainScreen].bounds];
        self.window.rootViewController = naviVc;
        [self.window makeKeyAndVisible];
        return YES;
    }
}

- (UISceneConfiguration *)application:(UIApplication *)application configurationForConnectingSceneSession:(UISceneSession *)connectingSceneSession options:(UISceneConnectionOptions *)options
{
    NSString *cfgName = @"FirstScene"; //场景名字
    if ([options.userActivities.objectEnumerator.nextObject.activityType isEqualToString:@"open_by_first"]) //使用哪个场景
    {
        cfgName = @"SecondScene";
    }
    return [[UISceneConfiguration alloc] initWithName:cfgName sessionRole:connectingSceneSession.role];
}
@end
创建(修改)SceneDelegate
为求简单,本文采用多组Window+SceneDelegate来管理多个窗口,即每个Window都有自己的SceneDelegate。本文实现了两个窗口的情形。
第一个SceneDelegate代码如下
@interface FirstSceneDelegate : UIResponder <UIWindowSceneDelegate>

@property (strong, nonatomic) UIWindow * window;

@end

@implementation FirstSceneDelegate

- (void)scene:(UIScene *)scene willConnectToSession:(UISceneSession *)session options:(UISceneConnectionOptions *)connectionOptions
{
    session.userInfo = @{@"userData":@"first_session"};
    if (self.window == nil)
    {
        FirstSceneViewController *vc = [[FirstSceneViewController alloc] init]; // 自己定义的页面
        UINavigationController *naviVc = [[UINavigationController alloc] initWithRootViewController:vc];//页面导航
        self.window = [[UIWindow alloc] initWithFrame:[UIScreen mainScreen].bounds];
        self.window.windowScene = (UIWindowScene *)scene;
        self.window.rootViewController = naviVc;
        [self.window makeKeyAndVisible];
    }
}
@end
第二个SceneDelegate代码如下
@interface SecondSceneDelegate : UIResponder < UIWindowSceneDelegate ,NSUserActivityDelegate>

@property (nonatomic,strong) UIWindow * window;

@end

@implementation SecondSceneDelegate

// 将要连接到某个场景(Window需要依附在具体场景)
- (void)scene:(UIScene *)scene willConnectToSession:(UISceneSession *)session options:(UISceneConnectionOptions *)connectionOptions
{
    session.userInfo = @{@"userData":@"second_session"};
    if (self.window == nil)
    {
        SecondSceneViewController *vc = [[SecondSceneViewController alloc] init]; // 自己定义的页面
        UINavigationController *naviVc = [[UINavigationController alloc] initWithRootViewController:vc];//页面导航
        self.window = [[UIWindow alloc] initWithFrame:[UIScreen mainScreen].bounds];
        self.window.windowScene = (UIWindowScene *)scene;
        self.window.rootViewController = naviVc;
        [self.window makeKeyAndVisible];
    }

}

@end
在第一个窗口的页面下,使用按钮打开第二个窗口
按钮事件响应
- (void)onClickButton:(id)sender
{
    if (@available(iOS 13.0, *))
    {
        if (UIApplication.sharedApplication.supportsMultipleScenes)
        {
            if  (UIDevice.currentDevice.userInterfaceIdiom == UIUserInterfaceIdiomPad
                 || UIDevice.currentDevice.userInterfaceIdiom == UIUserInterfaceIdiomVision)
            {

                // 查找,确定是否已经打开过
                UISceneSession *foundSession = nil;
                NSString * foundStr = @"second_session";
                for (UISceneSession * session in UIApplication.sharedApplication.openSessions)
                {
                    if (session.userInfo && [foundStr isEqualToString:session.userInfo[@"userData"]])
                    {
                        foundSession = session;
                        break;
                    }
                }

                UISceneActivationRequestOptions *optios = nil;
                if (foundSession) // 已存在,激活即可
                {
                    [UIApplication.sharedApplication requestSceneSessionActivation:foundSession
                                                                      userActivity:nil
                                                                           options:optios
                                                                      errorHandler:^(NSError * _Nonnull error) {
                        NSLog(@"%@",error);
                    }];
                }
                else // 新建场景
                {
                    NSUserActivity * activity = [[NSUserActivity alloc] initWithActivityType:@"open_by_first"];
                    [UIApplication.sharedApplication requestSceneSessionActivation:nil
                                                                      userActivity:activity
                                                                           options:optios
                                                                      errorHandler:^(NSError * _Nonnull error) {
                        NSLog(@"%@",error);
                    }];
                }
            }
        }
    }
}
其他注意事项
- 启用Scene后,UIAlertView将无法使用(运行时崩溃),需要用UIAlertController进行替换
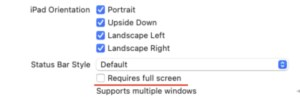
- 在iPad端,实现多窗口时,需要将Info.list里的
Requires full screen置为false,同时要设置为支持所有屏幕方向。否则可能会收到类似错误“the delegate of workspace fbscenemanger declined to create scene”
发表回复
要发表评论,您必须先登录。